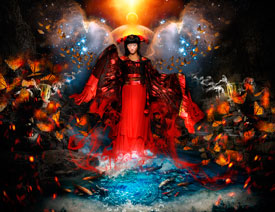
Photoshop�ϳɳ��б����ǹ��������Ӣ��(4)
����Դ�� Photoshoptutorials�����x���� Jarka Hrnč��rko �o�҂����������ʵ����£�Step 11 – Darker Sky
Sky should be even more darker. You’ll change it in this step. Add new adjustment layer Curves on the top of all layers and set it as on the following picture.

To adjust only sky and not the rest of the image grab the Paint Bucket Tool (B) and fill the the layer mask of this adjustment layer with solid black color. Grab the Gradient Tool (G), pick white color and make linear gradient from the upper part of the image to horizon similarly as you did in one of the previous steps. You can see where to put gradient on the following photo. That area is highlighted with red color.

After this step your photo manipulation should look similar as the picture below.

Step 12 – Lighter Center
In this step you’ll make the center of the image lighter. It will create more dimension and drama in your photo manipulation. Human eye first looks at the bright parts of the image. You can use this fact to lead viewer’s eye on the parts of the image you want. Add new adjustment layer Levels and set the Input Levels on 0; 1,00; 175.

Grab the Paint Bucket Tool (G) and fill the layer mask of this adjustment layer with solid black color. Grab the Gradient Tool (G), select Radial Gradient. Pick white color and create gradient in the center of the image.

On the following photo you can see where to put the gradient. That area is highlighted with red color.

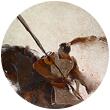
Step 13 – Adding Lens Flare
In this step you’ll continue with highlighting the center of the image and creating more interesting light. Add new empty layer on the top of all layers and name it LENS FLARE. Pick the Paint Bucket Tool (G) and fill this new layer with solid black color. Go to Filter > Render > Lens Flare and set it as on the following picture. Press OK.

To blend this layer properly with the rest of the image change its Blending Mode from Normal to Screen.

On the following photo you can see how your photo manipulation should look like so far.

Step 14 – Adjusting Lens Flare
As you may notice lens flare doesn’t look realistic right now. You’ll fix it in this step by blurring and desaturating. Click on the LENS FLARE layer and go to Image > Adjustments > Hue/Saturation and set the value Saturation on -100.

To blur the lens flare go to Filter > Blur > Gaussian Blur and set the value Radius on 3,0 pixels. Press OK.

On the following picture you can compare how the lens flare looks before and after this step.

 ���㲻Ҫ��
-
 Photoshop�������L�������ƬЧ����Ӣ��2018-04-23
-
 Photoshop�ϳ��L����������L�i¹��Ӣ��2018-04-23
-
 Photoshop�ϳɱ�����Ч�Ľ��~������Ӣ��2018-02-10
-
 Photoshop�ϳɉ����L���ɭ�ֈ�����Ӣ��2018-02-10
-
 Photoshop�ϳ�����ʩ��������Ӣ��2018-02-10
-
 Photoshop���������|�е�3D���w�֡�Ӣ��2018-01-09
-
 Photoshop�OӋ����ȼ��ˇ�g�ֽ̡̳�Ӣ��2018-01-09
-
Photoshop�ϳɱ�����Ч�Ľ��~������Ӣ��
���P����34052018-02-10
-
Photoshop�ϳɉ����L���ɭ�ֈ�����Ӣ��
���P����24492018-02-10
-
 Photoshop�ϳɄ����Ӣ�ۑ����̡̳�Ӣ��
���P����5802017-12-12
Photoshop�ϳɄ����Ӣ�ۑ����̡̳�Ӣ��
���P����5802017-12-12
